Team Tasks
- Cynthia: Mounting Wall Sensors
- Asena: Schmitt Trigger, Code debugging
- Nonso: Schmitt Trigger debugging
- Robert: Programming
- Laasya: FFT integration, Code debugging
Milestone Description
The goal of this milestone was to get our robot to successfully circle an arbitrary set of walls, avoid other robots, and follow lines.
Milestone Materials
3 wall sensors (GP2Y0A41SK0F)
Part 1 - Hooking up the Wall Sensors
We connected the wall sensor's three pins to ground, power, and an analog input (A2). The wall sensor outputs an analog voltage, a higher voltage indicates a closer object to the wall sensor. Using the following code, we were able to detect how far away the sensor was from a wall.
void setup() {
    Serial.begin(9600);
  }

void loop() {
    float sensorValue = analogRead(A2); // Read sensor value for analog pin A2
    float dis = 2076/(sensorValue - 11); // convert to a distance

    if (dis < 4 || dis >30) {
        Serial.print( "Out of Range.\n");
    }
    else {
        Serial.print(dis);
        Serial.print(" cm\n");
    }
    delay(500);
}
Here is a video of the code in action. Laasya moves her hand farther away from the sensor until she is out of range, and then moves back into range.
The Arduino only has 6 analog inputs. We were already using three analog inputs for the three line sensors we implemented in Milestone 1, and two analog inputs for the microphone detection and IR detection. This only left us one analog input. We decided to change the analog output from the wall sensor into a digital output that could be read by the Arduino's digital pins. We did this using a Schmitt Trigger. None of us had made a Scmitt Trigger before, so we found a calculator online.
We decided on a low threshold of 0.56 V and a high threshold of 1.09 V. We chose an output voltage low of 0V and high of 3.5V. The low threshold corresponds to when the wall sensor is 20 cm away from an object, and the high threshold corresponds to when the wall sensor is 10 cm away from an object. These inputs to the schmitt trigger calculator gave us that R2 = 1.51 kΩ, R1 = 10 kΩ, and Vref = 0.94.
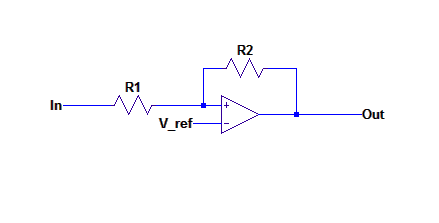
We built this circuit and tested it by putting input voltages from a DC voltage source and checking the output with an oscilloscope. The output voltages were as expected: when we increased the voltage source slowly from 0 -> 1V, we stayed at an output voltage of around 0 until suddenly we got an output of 3.5V for an input of 1V. Then, we decreased the voltage source slowly from 1V-> 0.5V. We stayed at a high output voltage until we got an output of 0V for an input of 0.5V. Then, we tested that the wall sensor gave us a voltage of 1V or greater when we put an object close to it, and a voltage of .5V or less when an object was far away. However, when we put the wall sensor as the input of our schmitt trigger, nothing worked! The output stayed high (3.5V) forever. With the help of multiple TAs, we figured out that our resistor values were too small. The ratio of R2/R1 is what matters, so we switched R2 from 1.5kΩ to 15kΩ and R1 from 10kΩ to 100kΩ. We kept Vref the same. Then, our schmitt trigger worked as expected using the wall sensor as an input.
Part 2 - Avoiding Walls
After successfully building a Schmitt Trigger circuit, we built two more so that we would have one for every wall sensor. We connected the output of every Schmitt trigger to a digital pin on the Arduino. The digital pins read high when there was a wall in front of the sensor and low when nothing was within 20cm of the sensor. We verified the output of the wall sensors with the following method:
int lw = 6;
int fw = 7;
int rw = 8;

void checkWallSensors(){
  Serial.print("left wall : ");
  Serial.print(digitalRead(lw));
  Serial.print(" front wall : ");
  Serial.print(digitalRead(fw));
  Serial.print(" right wall : ");
  Serial.print(digitalRead(rw));
  Serial.println();
  delay(50);
}
After verifying the output of the Serial monitor, we attached three external LEDs to our Arduino, each LED corresponded to one of the wall sensors and we programmed each LED to turn on when its corresponding wall sensor detected a wall.
Part 3 - Avoiding Walls while Staying on the Line
We took our line following code from Milestone1 and added logic to avoid walls. We originally added logic for avoiding robots as well, but took this part out because we found out that the FFT library and the servos use the same timer, which causes nothing to work. We will attach the final code at the end, but for now, we will discuss how we avoided walls. If the robot has multiple directions it can go, it favors straight over left over right.
When we are not at an intersection, we just follow the line using our logic from Milestone1.
When we reach an intersection, we check our surroundings.
If there is no wall in front of us, we go straight.
If there is a wall in front and on one of the sides, we turn towards the side without a wall.
If there is only a wall in the front, we turn left.
If there is a wall in every direction, we turn around.
We only check for walls at intersections because the walls determine whether we have to turn and in which direction. There is no point in checking for walls if we are not at an intersection because we can only turn left or right when we are at an intersection-- We must follow the line!
Part 3 - Avoiding Walls while Staying on the Line and Avoiding Robots
The FFT library and servos use the same timer which causes the servos to not run. The issue is that to run the FFT, you need to change the values of some registers (TIMSK0, ADCSRA, ADMUX, DIDR0). We worked around this by saving the default values of these registers before they are altered and then resetting them after the FFT is run. Our next issue is that our code was taking up close to 100% of dynamic memory: we got a warning that the behavior of our Arduino would be unstable. The FFT library took up a major chunk of our memory, we had to figure out how to reduce the memory it required. We did this by changing the FFT from taking 256 samples to 128. This saved us about 30% of our dynamic memory. We only run the FFT when we reach an intersection because we can only turn left or right when we are at intersection. We run the FFT and then check the proper bin for a peak. If there is a peak, this indicates there is a robot in front of ours and we treat this robot just like a wall. If we see a robot, we will not go straight, the direction we do go depends whether there are walls to our right and left. Our logic for avoiding walls while staying on the line and avoiding robots:
If the robot is not at an intersection, then follow the line.
Else the robot is at an intersection, so check its surroundings.
If the robot can go forward without hitting a wall or another robot, go forward.
If the robot can't go forward, but it can go left, turn left.
If the robot can't go forward or left, but can go right, turn right.
If the robot can't go forward, left, or right, turn around.
Here is a video of our robot in action, following lines, avoiding walls, and avoiding robots!! The yellow debug LED corresponds to the robot, the green LED next to yellow corresponds to the left wall sensor, the next LED corresponds to the front sensor, and then the final LED (furthest from the yellow LED) corresponds to the right sensor.
The robot is moving around the maze and then sees the robot (the IR hat) so turns to avoid it.
The code for wall avoidance, robot avoidance, and line following:
#include <Servo.h>
#define LOG_OUT 1 // use the log output function
//#define FFT_N 256 // set to 256 point fft LEGACY
#define FFT_N 128 // CHANGED 128 pt FFT

#include <FFT.h> // include the library

Servo left; //180 turns wheel backward
Servo right; //180 turns wheel forward

int leftPin = A0; //left
int middlePin = A5; //center
int rightPin = A1; //right
int IR = A3;
int leftSensor;
int rightSensor;
int middleSensor;
int leftSpeed;
int rightSpeed;
int lw = 6;
int fw = 7;
int rw = 8;

int rightLED = 12;
int frontLED = 2;
int leftLED =  3;
int robotLED = 4;
boolean IRDetected;
int defaultT = TIMSK0;
int defaultADC = ADCSRA;
int defaultADMUX = ADMUX;
int defaultD = DIDR0;

//helper methods
void runFFT(){
    defaultT = TIMSK0;
    defaultADC = ADCSRA;
    defaultADMUX = ADMUX;
    defaultD = DIDR0;
    TIMSK0 = 0; // turn off timer0 for lower jitter
    ADCSRA = 0xe5; // set the adc to free running mode
    ADMUX = 0x43; // use adc3
    DIDR0 = 0x01; // turn off the digital input for adc0
    cli();  // UDRE interrupt slows this way down on arduino1.0
    //for (int i = 0 ; i < 512 ; i += 2) {  save 256 samples LEGACY

    for (int i = 0 ; i < 256 ; i += 2) {  //CHANGED
      while(!(ADCSRA & 0x10)); // wait for adc to be ready
      ADCSRA = 0xf5; // restart adc
      byte m = ADCL; // fetch adc data
      byte j = ADCH;
      int k = (j << 8) | m; // form into an int
      k -= 0x0200; // form into a signed int
      k <<= 6; // form into a 16b signed int
      fft_input[i] = k; // put real data into even bins
      fft_input[i+1] = 0; // set odd bins to 0
    }
    fft_window(); // window the data for better frequency response
    fft_reorder(); // reorder the data before doing the fft
    fft_run(); // process the data in the fft
    fft_mag_log(); // take the output of the fft
    sei();
//    Serial.println("start");
//    for (byte i = 0 ; i < FFT_N/2 ; i++) {
//      Serial.println(fft_log_out[i]); // send out the data
//    }
      TIMSK0 = defaultT;
      ADCSRA = defaultADC;
      ADMUX = defaultADMUX;
      DIDR0 = defaultD;
}

void goStraight() {
  leftSpeed = 95;
  rightSpeed =85;
  left.write(leftSpeed);
  right.write(rightSpeed);
  delay(300);
}

void turnLeft() {
  //go straight for 200 ms and then turn left
  left.write(95);
  right.write(85);
  delay(200);
  leftSpeed = 85;
  rightSpeed = 85;
  left.write(leftSpeed);
  right.write(rightSpeed);
  delay(700);
}

void turnRight() {
  //go straight for 200 ms and then turn right
  left.write(95);
  right.write(85);
  delay(200);
  leftSpeed = 95;
  rightSpeed = 95;
  left.write(leftSpeed);
  right.write(rightSpeed);
  delay(700);
}

void turnAround() {
 leftSpeed = 95;
  rightSpeed = 95;
  left.write(95);
  right.write(85);
  delay(200);
  left.write(leftSpeed);
  right.write(rightSpeed);
  delay(1400);
}

void setup() {
  // put your setup code here, to run once:
  Serial.begin(115200); // use the serial port
  Serial.println("starting");
  left.attach(10);
  right.attach(5);
  left.write(90);
  right.write(90);

  //wall sensors
  pinMode(lw, INPUT);
  pinMode(fw, INPUT);
  pinMode(rw, INPUT);

  //output LEDs
  pinMode(rightLED, OUTPUT);
  pinMode(leftLED, OUTPUT);
  pinMode(frontLED, OUTPUT);
  pinMode(robotLED, OUTPUT);
  Serial.println("finished setup");
}
void checkWallSensors(){
  Serial.print("left wall : ");
  Serial.print(digitalRead(lw));
  Serial.print(" front wall : ");
  Serial.print(digitalRead(fw));
  Serial.print(" right wall : ");
  Serial.print(digitalRead(rw));
  Serial.println();
  delay(50);
}

void loop() {
    //Serial.println("entering loop");
    //read line sensors
    leftSensor = analogRead(leftPin);
    middleSensor = analogRead(middlePin);
    rightSensor = analogRead(rightPin);


    //At Intersection, need to decide where to go
    if (leftSensor < 800  && middleSensor< 800 && rightSensor < 800){
        //FFT IR
        Serial.println("at an intersection");
        runFFT();

        //check if IR sensor detects another robot based on FFT

        //for (int i = 38; i < 48; i++){  //LEGACY : 256 bit fft
        IRDetected = 0;
        for (int i = 15; i < 25; i++){ //changed
          if (fft_log_out[i] > 125){
            //Serial.println(fft_log_out[i]);
            IRDetected = 1;
            break;
          }
        }


        //What can you see?
        int seen = B0000;
        digitalWrite(leftLED, LOW);
        digitalWrite(rightLED, LOW);
        digitalWrite(frontLED, LOW);
        digitalWrite(robotLED, LOW);
        if (IRDetected){
          Serial.println("IR detected");
          seen |= B1000;
          digitalWrite(robotLED, HIGH);
        }
        //left wall
        if (digitalRead(lw)){
          Serial.println("left wall detected");
          seen |= B0100;
          digitalWrite(leftLED, HIGH);
        }
        //front wall
        if (digitalRead(fw)){
          Serial.println("front wall detected");
          seen |= B0010;
          digitalWrite(frontLED, HIGH);
        }
        //right wall
        if (digitalRead(rw)){
          Serial.println("right wall detected");
          seen |= B0001;
          digitalWrite(rightLED, HIGH);
        }

        switch (seen) {
          case B0010:
            //wall in front only!! turn left
            turnLeft();
            Serial.println("wall in front");
            break;
          case B1000:
            turnLeft();
            Serial.println("robot in front");
            break;
          case B0110:
            //wall in front and left, turn right
            turnRight();
            Serial.println("wall in front and left, turn right");
            break;
          case B0011:
            //wall in front and right, turn left
            turnLeft();
            Serial.println("wall in front and right, turn left");
            break;
          case B0111:
            //wall in front, right and left, turn around
            turnAround();
            Serial.println("wall in front, right and left, turn around");
            break;
          case B1100:
            //wall on left, robot in front, turn right
            turnRight();
            Serial.println("wall on left, robot in front, turn right");
            break;
          case B1001:
            //wall on right, robot in front, turn left
            turnLeft();
            Serial.println("wall on right, robot in front, turn left");
            break;
          case B1101:
            //wall on right and left, robot in front, turn around
            turnAround();
            Serial.println("wall on right and left, robot in front, turn around");
            break;
          //weird cases
          case B1110:
            //wall on left and front, robot in front?, turn right
            turnRight();
            Serial.println("wall on left and front, robot in front?, turn right");
            break;
          case B1011:
            //wall on right and front, robot in front?, turn left
            turnLeft();
            Serial.println("wall on right and front, robot in front?, turn left");
            break;
          case B1111:
            //wall on right and left and front, robot in front?, turn around
            turnAround();
            Serial.println("wall on right and left and front, robot in front?, turn around");
            break;
          default:
            //go straight
            goStraight();
            Serial.println("going straight");
            Serial.println(seen);
            break;
    }
    //straight line following
    }else if ( middleSensor < 800){
        //Serial.println("going straight");
        leftSpeed = 95;
        rightSpeed = 85;
        left.write(leftSpeed);
        right.write(rightSpeed);
      }
      else {
        if (leftSensor < 800){
          //TURN LEFT
          //Serial.println("turning left onto line");
          leftSpeed = 85;
          rightSpeed = 85;
        }
        if (rightSensor < 800){
          //TURN RIGHT
         // Serial.println("turning right onto line")
          leftSpeed = 95;
          rightSpeed = 95;
        }
        left.write(leftSpeed);
        right.write(rightSpeed);
      }

}